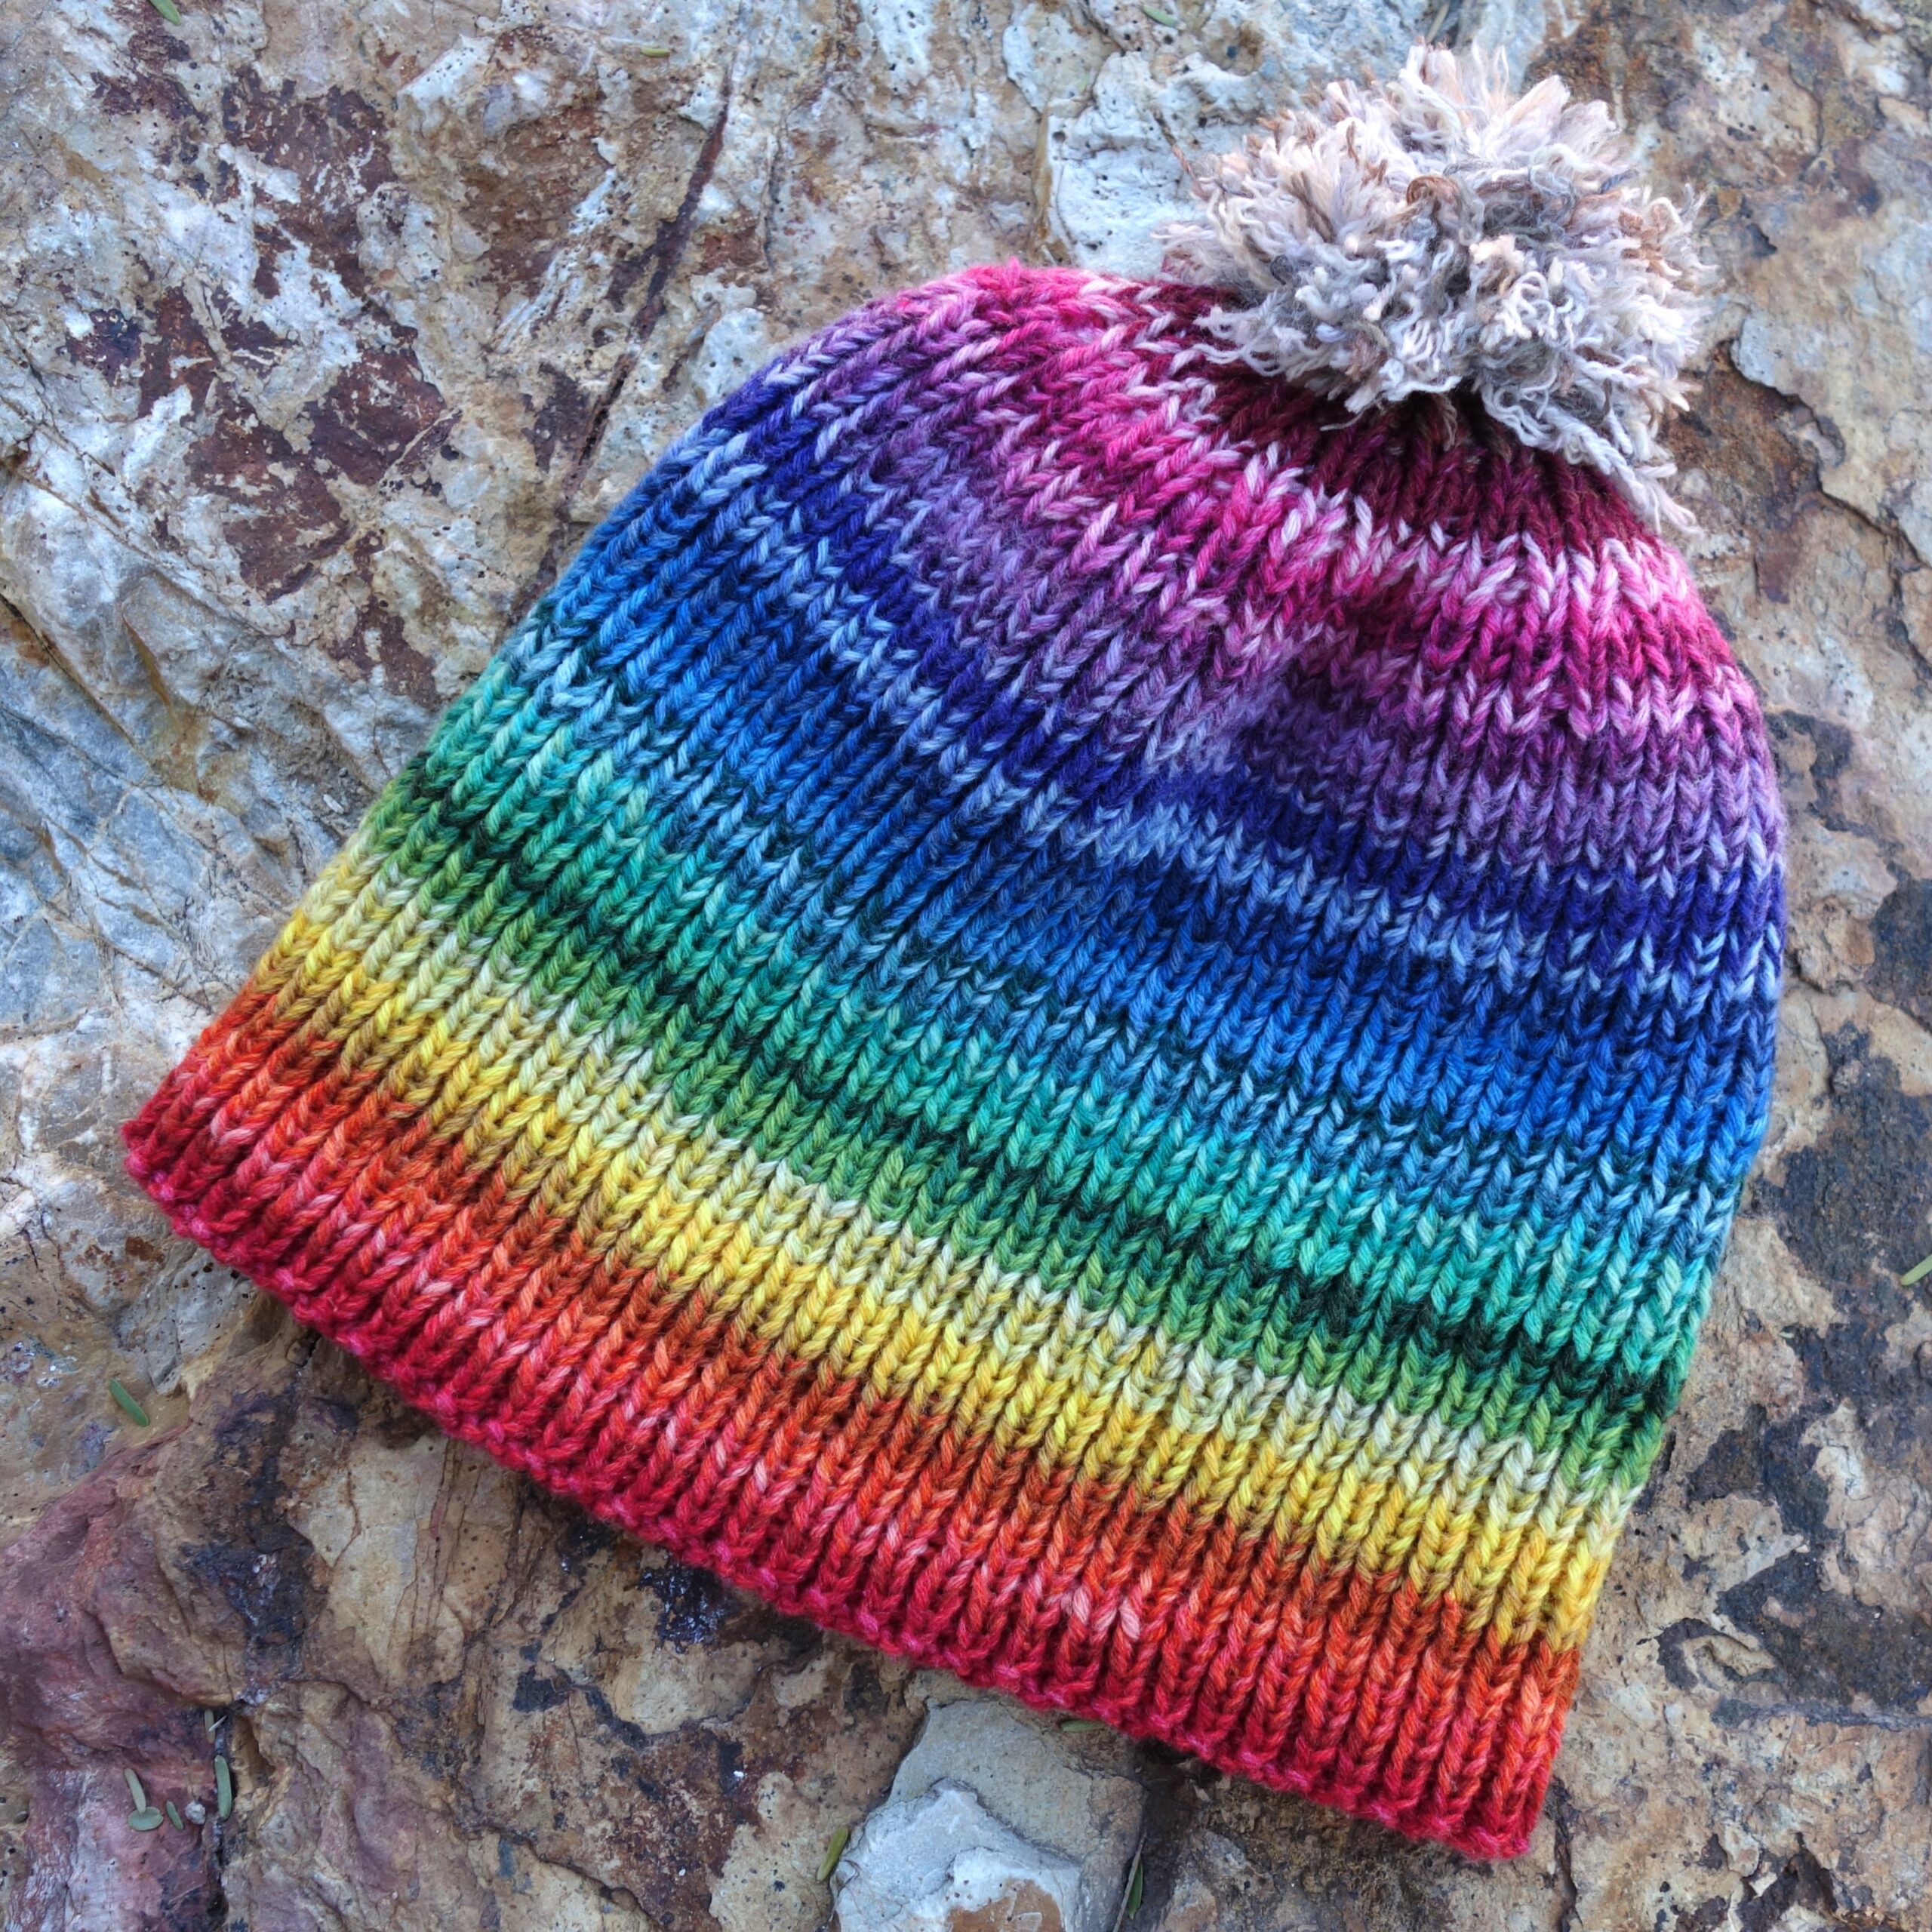
This is a pattern for a really basic 1×1 ribbed knit hat with an optional pompom. This is designed to use leftover metropolis yarn from a Festival of Lights CAL Metropolis color pack. I am using the yarn held two strands together and I did a Russian join to make this work with a lot of very small amounts of yarn remaining (between 1-3g per color). I arranged the colors in rainbow order and had a lot of fun making this hat. I think if I were to do it again, I would have mixed up the colors a lot more and made it a little longer so that it could be folded. I used 3.5mm knitting needles. I probably could have gone up to a 4mm but mine where occupied, so I used my 3.5mm. This pattern is really adjustable so it can be made in many sizes with most yarns, you just need to make a small gauge swatch and make an easy calculation.


The one slightly unique bit about this hat is in the decrease. I really wanted the decrease to be a non-prominente feature of the hat and after trying several different ideas I turned the hat inside out and found that the reverse looked just how I wanted. So, this hat is knit inside out and when you are done you turn it right side out to finish.

Materials
about 90-100g of Scheepjes Metropolis (75% Extra Fine Merino Wool, 25% Nylon; 50g/200m) leftover from Metropolis Color Pack* held two strands together. A Russian Join is used to work with many scraps of different colors.
3.5mm, 40cm circular needles* and matching double points*,
* Disclosure: This is an affiliate links. This means that, at zero cost to you, I will earn an affiliate commission if you click through the link and finalize a purchase.

Gauge and how to Adjust the Pattern
For this project this was my approximate gauge:
28 sts + 32 rows = 4in (10cm) in 1×1 ribbing
I wanted my hat to fit head circumferences about 22in (56cm) and most information I have read on sizing knit hats recommends about 2-2.5in (5-6cm) of negative ease.
(Head circumference – Negative ease) * (stitches / guage) = number of stitches
⇒ (22in – 2.5in) * (28 sts / 4in) = 136.5 stitches ⇒ Round to 136 stitches
Round this to a whole, even number and you have the number of stitches that your hat should be.
The decrease is also worked in multiples of 8 so for a perfectly symmetrical decrease make sure that your stitches are in multiples of 8, however if they aren’t you can fudge it a little.
For a looser hat use less negative ease and for a tighter hat use more.
Russian Join
A Russian join is a great way to join yarn for a scrappy project as it takes care of the ends and is smooth to work over. I find this works best for slightly less bulky yarns and is better for yarns with more grip like wool.
- start by overlapping the two ends you wish to join and folding them back on themselves. Thread one end on your sharp tapestry needle.
- Stick the needle back up through the yarn, it will sort of bunch around the needle.
- Pull needle and the yarn-end through and tug it to remove the bunching, then repeat with the other yarn end.
- When completed the two yarn ends will be nicely interlocked.


Abbreviations
- k knit
- p purl
- p2tog purl 2 stitches together to decrease by 1 stitch: insert needle pearlwise into first 2 sts and purl them together
- k2tog knit 2 stitches together, single right-leaning decrease
- ssk slip 2 stitches knitwise, knit these 2 stitches together through back loops, single left-leaning decrease
- RS right side
- WS wrong side
Instructions
Working with 2 strands of metropolis held together.
Cast on 136+1 stitches on to circular needles (or the number that you calculated above +1). I used a long tail cast on, but you can use any cast on method you prefer.
make sure your work is not twisted, then slip the last stitch cast on to the left needle, pass the 2nd stitch on the left needle over the first stitch, then move this stitch back to the right needle. You should now have an even number of stitches on your needles joined in the round
Round 1: * k1, p1, repeat from * to end of round. (136 sts)
Add a new color with a Russian join each time you get to the end of a scrap or have knit as much with that color as you want to.
Repeat round 1 until your hat measured about 7in (18cm) or desired length.
I recommend simply trying it on, if the hat fits as you want it with the knitting needles on the top of your head, then it you are ready to begin the decrease.
Begin the decrease, switch double points when the stitches no longer stretch around the circular needle (or use a magic loop).
Round 1: *k1, p1, k1, p1, k1, k2tog, p1, repeat from * to end of round. (119 sts)
Round 2: *k1, p1, k1, p1, ssk, p1, repeat from * to end of round. (102 sts)
Round 3: * k1, p1, repeat from * to end of round.
Rounds 4-5: repeat round 3.
Round 6: *k2tog, k1, p1, k1, p1, repeat from * to end of round. (85 sts)
Round 7: *ssk, p1, k1, p1, repeat from * to end of round. (68 sts)
Rounds 8-10: repeat round 3.
Round 11: *k2tog, k1, p1, repeat from * to end of round. (51 sts)
Round 12: *ssk, p1, repeat from * to end of round. (34 sts)
Rounds 13-15: repeat round 3.
Round 16: *p2tog, repeat from * to end of round. (17 sts)
Round 17: p in each stitch around.
Fasten off by breaking yarn leaving a good 4-6in (10-15cm), thread yarn tail(s) on to a tapestry needle and feed it through the loops on the knitting needles them remove the knitting needles. Thread the yarn around the loops a few more times to secure and weave in the end securely.
Now turn your hat inside out, the inside is now the outside.
Trim any little bits that are sticking out leftover from the Russian join if you like.


Making a Pompom
If you would like to make a pompom for your hat here is my “super sophisticated” method for making one.
Cut a piece of cardboard to about half the width that you would like for a pompom. Temporarily tape a string (or double string) to ether end so that you can wrap the yarn over it. Use something strong that you can pull really tight without breaking like a cotton yarn.
Wrap yarn around the cardboard until you have what feels like enough. I uses most of the scraps of metropolis in shades of whites, light greys and tans all held together.


Remove the tape and pull the string as tight as you can around yarn. You can use a needle to wrap it around a few times and tie it securely.
Cut all the yarn that is wrapped around the cardboard opposite to the tie. Hold the string and bunch all the yarn with the ends together and trim the ends so that they are all about the same length.


If you like use a comb to gently separate some of the strands of the yarn and make it extra fluffy. Then give it one final trim to even it out.


Now you can sew it onto your hat using the string.


Happy Crafting!

Support My Work
Thank you for reading my blog, you are supporting my design work just by being here! Here are some other ways you can support my design work.
- Follow me on Instagram or Facebook – I post new pattern releases and such on my Instagram feed and Facebook page, following, liking, and commenting will keep you up to date and help other find my design work.
- Join my Facebook group – This is a place to ask questions and get help from me and the community, share your creations and talk about my patterns.
- Browse my self-published patterns – I have several patterns on Etsy and Ravelry. My portfolio of designs is not extensive yet, but I am continuing to add new patterns.
- Watch my Videos on YouTube– I occasionally make YouTube videos to help with my patterns. Watching the videos, subscribing to my channel, commenting on and liking the videos will all support my design work. Even if you just play my videos in the background supports me as a designer.
- Affiliate links – Shopping through my links supports me at no additional cost to you as I get a small commission through my affiliates. My Amazon shop, Jimmy Beans Wool, Yarn Addicted and Co on Etsy (US shipping only)


Leave a Reply